
Table of Contents
Xen_Networking
This guide shows the types of networks Xen can be used on, or to set-up. It uses default configurations of xen, in their most simplest form. Firewalls and security is not discussed here. Feel free to email the author comments at: sburkeatburkesys.com Xen is used from Debian, and the following setup should be the same for Ubuntu and all other setups of Xen 3.
Overview of Networks with Xen
Xen can be configured to allow its virtual machines (vms) to:
- Use existing Networks and IP addresses.
- Create new virtual networks using private IP address ranges.
Xen has 3 main default setup configurations within /etc/xen/xend-config.sxp:
Bridge Networking
(network-script network-bridge) (vif-script vif-bridge)
Routed Networking with NAT
(network-script network-nat) (vif-script vif-nat)
Two-way Routed Network
(network-script network-route) (vif-script vif-route) Typically only one of the above can be used at the one time. The other two must be commented out. Note: there are loads of different ways to setup and define your own routing and bridges in xend-config.sxp This guide only covers the basic ones.
The selection and choice of the above 3 different default setups depends on both your current network setup, and your planned new network setup. Various scenarios are outlined next, and may help you to choose a particular configuration.
Network Scenarios
Situation 1
*You have an existing computer network at home or at work. *You simply want any VMs (xen virtual machines) to appear on this existing network. *You can freely add new computers to this existing network (via Static IP or DHCP over a wired connection), as you would your laptop etc. *You want to be able to access your VMs from your own computer, and visa versa.
Configuration to use: Bridge Networking
Situation 2
*You have an existing network at home or at work. *You have an assigned block of static public IPs from your ISP or Hosting Company. *You wish to host multiple webservers and multiple mailservers.
Configuration to use: Bridge Networking
Situation 3
*You have no computer network at home. *You only have a standalone computer to use for xen. *You may or maynot have the internet on this computer (dom0). *You want your VMs to be able to access the Internet (if it is available on dom0). *You want your VMs to be private and hidden from the Internet.
Configuration to use: Routed Networking with NAT
Situation 4
*You have a computer network at home or at work. *You want to create a new Private Network for your new VMs. *You want your VMs to be private and hidden from any outside networks. *You want to be able to reach the internet and other networks.
Configuration to use: Routed Networking with NAT
Situation 5
*You have a computer network at home or at work. *You want to create a new Private Network for your new VMs. *You want your VMs to be visible on your existing computer network. *You want to be able to access your VMs from your own computer, and visa versa.
Configuration to use: Two-way Routed Network
Bridge Networking
Bridge networking is the most simplest and easiest to configure within Xen. This type of networking simply allows your VMs to use a virtual ethernet card to join your existing network. It can be used for a lot of situations. Typically bridge networking is used where: *You can freely place a computer/device on your existing network. *Your existing network uses DHCP or Static IP addresses. *You want your VMs to be fully visible and available on your existing network, allowing all traffic in both directions.
Network Diagram
Xen Setup and Config for Bridge Networking
The essential pieces of networking configs are shown below. For a general over view of xen, setting up dom0 and domU, see: <br> http://wiki.kartbuilding.net/index.php/Debian_Etch_Xen_Install <br> http://wiki.kartbuilding.net/index.php/Create_DomU
:1. Configure xend-config.sxp vi /etc/xen/xend-config.sxp (network-script network-bridge) #(network-script network-nat) #(network-script network-route)
(vif-script vif-bridge) #(vif-script vif-nat) #(vif-script vif-route)
:2. Configure vm01.cfg (vm config file) vi /etc/xen/auto/vm01.cfg vif = 'ip=192.168.0.6' #thats all that is required for the networking part.
:3. Configure /etc/network/interfaces on the VM itself mount /srv/xen/vm01-disk.img /mnt vi /mnt/etc/network/interfaces auto eth0 iface eth0 inet static address 192.168.0.6 gateway 192.168.0.1 netmask 255.255.255.0
xm create /etc/xen/vm01.cfg xm console vm01
Done.
Troubleshooting Steps for Bridge Networking
On dom0, do a ifconfig and look for something similar to: dom0:~# ifconfig eth0 Link encap:Ethernet HWaddr 00:50:8B:DC:F7:2B
        inet addr:192.168.0.3  Bcast:192.168.0.255  Mask:255.255.255.192
        inet6 addr: fe80::250:8bff:fedc:f72b/64 Scope:Link
        UP BROADCAST RUNNING MULTICAST  MTU:1500  Metric:1
        RX packets:2848 errors:0 dropped:0 overruns:0 frame:0
        TX packets:1768 errors:0 dropped:0 overruns:0 carrier:0
        collisions:0 txqueuelen:0
        RX bytes:256292 (250.2 KiB)  TX bytes:277686 (271.1 KiB)
lo Link encap:Local Loopback
        inet addr:127.0.0.1  Mask:255.0.0.0
        inet6 addr: ::1/128 Scope:Host
        UP LOOPBACK RUNNING  MTU:16436  Metric:1
        RX packets:13 errors:0 dropped:0 overruns:0 frame:0
        TX packets:13 errors:0 dropped:0 overruns:0 carrier:0
        collisions:0 txqueuelen:0
        RX bytes:1120 (1.0 KiB)  TX bytes:1120 (1.0 KiB)
peth0 Link encap:Ethernet HWaddr FE:FF:FF:FF:FF:FF
        inet6 addr: fe80::fcff:ffff:feff:ffff/64 Scope:Link
        UP BROADCAST RUNNING NOARP  MTU:1500  Metric:1
        RX packets:3716 errors:0 dropped:0 overruns:0 frame:0
        TX packets:2046 errors:0 dropped:0 overruns:0 carrier:0
        collisions:0 txqueuelen:1000
        RX bytes:493403 (481.8 KiB)  TX bytes:318089 (310.6 KiB)
vif0.0 Link encap:Ethernet HWaddr FE:FF:FF:FF:FF:FF
        inet6 addr: fe80::fcff:ffff:feff:ffff/64 Scope:Link
        UP BROADCAST RUNNING NOARP  MTU:1500  Metric:1
        RX packets:1768 errors:0 dropped:0 overruns:0 frame:0
        TX packets:2848 errors:0 dropped:0 overruns:0 carrier:0
        collisions:0 txqueuelen:0
        RX bytes:277686 (271.1 KiB)  TX bytes:256292 (250.2 KiB)
vif1.0 Link encap:Ethernet HWaddr FE:FF:FF:FF:FF:FF
        inet6 addr: fe80::fcff:ffff:feff:ffff/64 Scope:Link
        UP BROADCAST RUNNING NOARP  MTU:1500  Metric:1
        RX packets:265 errors:0 dropped:0 overruns:0 frame:0
        TX packets:408 errors:0 dropped:203 overruns:0 carrier:0
        collisions:0 txqueuelen:0
        RX bytes:35758 (34.9 KiB)  TX bytes:215469 (210.4 KiB)
xenbr0 Link encap:Ethernet HWaddr FE:FF:FF:FF:FF:FF
        inet6 addr: fe80::200:ff:fe00:0/64 Scope:Link
        UP BROADCAST RUNNING NOARP  MTU:1500  Metric:1
        RX packets:208 errors:0 dropped:0 overruns:0 frame:0
        TX packets:0 errors:0 dropped:0 overruns:0 carrier:0
        collisions:0 txqueuelen:0
        RX bytes:16101 (15.7 KiB)  TX bytes:0 (0.0 b)
If you dont see the xenbr0, or vif1.0, or peth0, then Bridging is not setup correctly. Check the xend-config.sxp file to make sure ONLY (network-script network-bridge) and (vif-script vif-bridge) are enabled. Also make sure bridge-utils is also installed.
On dom0, do a iptables -L and look for something similar to: dom0:~# iptables -L Chain INPUT (policy ACCEPT) target prot opt source destination
Chain FORWARD (policy ACCEPT) target prot opt source destination ACCEPT 0 – 192.168.0.6 anywhere PHYSDEV match –physdev-in vif1.0 ACCEPT udp – anywhere anywhere PHYSDEV match –physdev-in vif1.0 udp spt:bootpc dpt:bootps
Chain OUTPUT (policy ACCEPT) target prot opt source destination
If you dont see the above, then you need to restart your dom0, restart xend, and make sure iptables is correctly installed. Check that the ip address listed is the correct one for the domU in question.
On the VM (vm01), do a ifconfig and look for something similar to: vm01:~# ifconfig eth0 Link encap:Ethernet HWaddr 00:16:3E:1D:1A:E9
        inet addr:192.168.0.6  Bcast:192.168.0.255  Mask:255.255.255.0
        inet6 addr: fe80::216:3eff:fe1d:1ae9/64 Scope:Link
        UP BROADCAST RUNNING MULTICAST  MTU:1500  Metric:1
        RX packets:391 errors:0 dropped:0 overruns:0 frame:0
        TX packets:263 errors:0 dropped:0 overruns:0 carrier:0
        collisions:0 txqueuelen:1000
        RX bytes:214108 (209.0 KiB)  TX bytes:39372 (38.4 KiB)
Check to see if you have the correct IP address, and if your Default gateway are correct.
Routed Networking with NAT
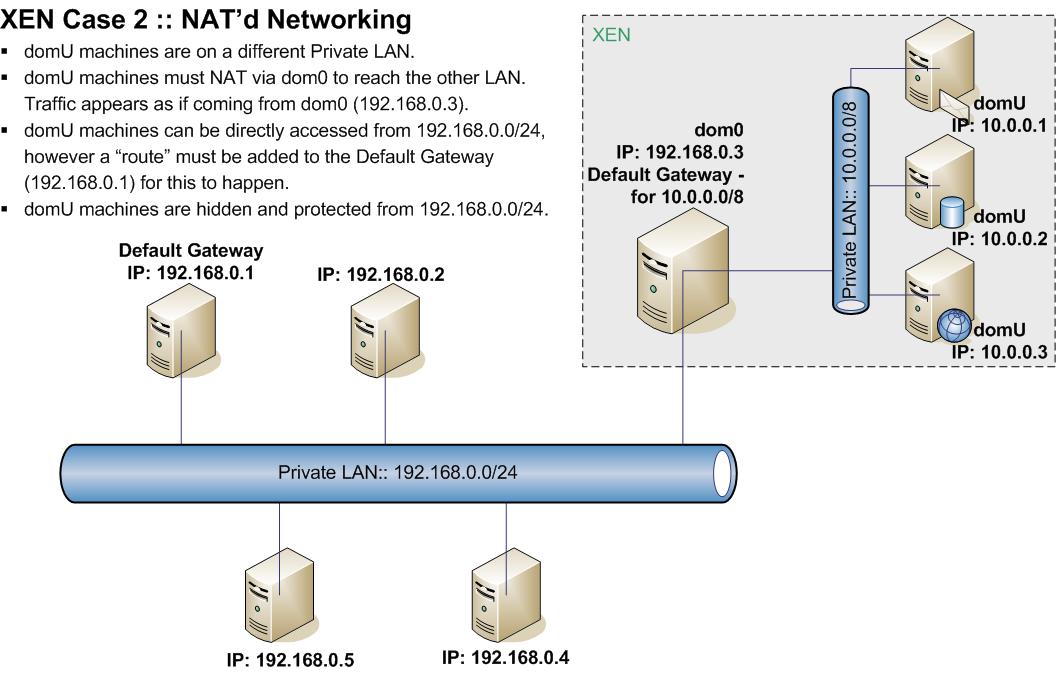
NATd Networking is the most common whereby a private LAN is created for Xen VMs. Traffic coming from the VMs is then networked to the outside network via NAT (Network Address Translation). Using the simple setup below, dom0 will automatically perform all the NAT'ing required.
Network Diagram
http://wiki.kartbuilding.net/images/Xen_Networks2.jpg
Lets explain the above diagram in a little more depth: *domU machines are on a different Private LAN. *domU machines must NAT via dom0 to reach the other LAN. Traffic appears as if coming from dom0 (192.168.0.3). If the VM ssh's into 192.168.0.5 (for example), it will appear as if you are coming/sshing from 192.168.0.3!! In otherwords your private IP is cloaked or hidden. <br> *domU machines are hidden and protected from 192.168.0.0/24.
Xen Setup and Config for NAT'd Networking
Only the essential pieces of networking configs are shown below.
:1. Configure xend-config.sxp vi /etc/xen/xend-config.sxp (network-script network-nat) #(network-script network-bridge) #(network-script network-route)
(vif-script vif-nat) #(vif-script vif-bridge) #(vif-script vif-route)
:2. Configure vm01.cfg (vm config file) vi /etc/xen/auto/vm01.cfg vif = 'ip=10.0.0.1' #thats all that is required for the networking part.
:3. Configure /etc/network/interfaces on the VM itself mount /srv/xen/vm01-disk.img /mnt vi /mnt/etc/network/interfaces auto eth0 iface eth0 inet static address 10.0.0.1 gateway 10.0.0.254 netmask 255.255.255.0
xm create /etc/xen/vm01.cfg xm console vm01
Done. So all VMs (10.0.0.0/24) will be able to fully access each other. They will be able access the external network (192.168.0.0/24) via dom0. All traffic NAT'd out from 10.0.0.0/24 to 192.168.0.0/24 will appear from the ip of dom0, i.e. 192.168.0.3 on the external network. As a result the VMs inside this Private LAN are cloaked and hidden.
Troubleshooting Steps for NAT'd Networking
On dom0, do a ifconfig and compare it to: dom0:~# ifconfig eth0 Link encap:Ethernet HWaddr 00:50:8B:DC:F7:2B
        inet addr:192.168.0.3  Bcast:192.168.0.254  Mask:255.255.255.0
        inet6 addr: fe80::250:8bff:fedc:f72b/64 Scope:Link
        UP BROADCAST RUNNING MULTICAST  MTU:1500  Metric:1
        RX packets:1662 errors:0 dropped:0 overruns:0 frame:0
        TX packets:998 errors:0 dropped:0 overruns:0 carrier:0
        collisions:0 txqueuelen:1000
        RX bytes:153897 (150.2 KiB)  TX bytes:145027 (141.6 KiB)
lo Link encap:Local Loopback
        inet addr:127.0.0.1  Mask:255.0.0.0
        inet6 addr: ::1/128 Scope:Host
        UP LOOPBACK RUNNING  MTU:16436  Metric:1
        RX packets:8 errors:0 dropped:0 overruns:0 frame:0
        TX packets:8 errors:0 dropped:0 overruns:0 carrier:0
        collisions:0 txqueuelen:0
        RX bytes:560 (560.0 b)  TX bytes:560 (560.0 b)
vif1.0 Link encap:Ethernet HWaddr FE:FF:FF:FF:FF:FF
        inet addr:10.0.0.128  Bcast:0.0.0.0  Mask:255.255.255.255
        inet6 addr: fe80::fcff:ffff:feff:ffff/64 Scope:Link
        UP BROADCAST RUNNING MULTICAST  MTU:1500  Metric:1
        RX packets:129 errors:0 dropped:0 overruns:0 frame:0
        TX packets:144 errors:0 dropped:0 overruns:0 carrier:0
        collisions:0 txqueuelen:0
        RX bytes:13672 (13.3 KiB)  TX bytes:17774 (17.3 KiB)
On dom0, do a iptables -L and compare it to: dom0:~# iptables -L Chain INPUT (policy ACCEPT) target prot opt source destination
Chain FORWARD (policy ACCEPT) target prot opt source destination ACCEPT 0 – 10.0.0.1 anywhere PHYSDEV match –physdev-in vif1.0 ACCEPT udp – anywhere anywhere PHYSDEV match –physdev-in vif1.0 udp spt:bootpc dpt:bootps
Chain OUTPUT (policy ACCEPT) target prot opt source destination
On dom0, do a route and compare it to: dom0:~# route Kernel IP routing table Destination Gateway Genmask Flags Metric Ref Use Iface 10.0.0.1 * 255.255.255.255 UH 0 0 0 vif1.0 192.168.0.0 * 255.255.255.0 U 0 0 0 eth0 default 192.168.0.1 0.0.0.0 UG 0 0 0 eth0
On domU, do a ifconfig and compare it to: vm01:~# ifconfig eth0 Link encap:Ethernet HWaddr 00:16:3E:4B:2F:21
        inet addr:10.0.0.1  Bcast:10.0.0.255  Mask:255.255.255.0
        inet6 addr: fe80::216:3eff:fe4b:2f21/64 Scope:Link
        UP BROADCAST RUNNING MULTICAST  MTU:1500  Metric:1
        RX packets:144 errors:0 dropped:0 overruns:0 frame:0
        TX packets:129 errors:0 dropped:0 overruns:0 carrier:0
        collisions:0 txqueuelen:1000
        RX bytes:17774 (17.3 KiB)  TX bytes:15478 (15.1 KiB)
Two-way Routed Network
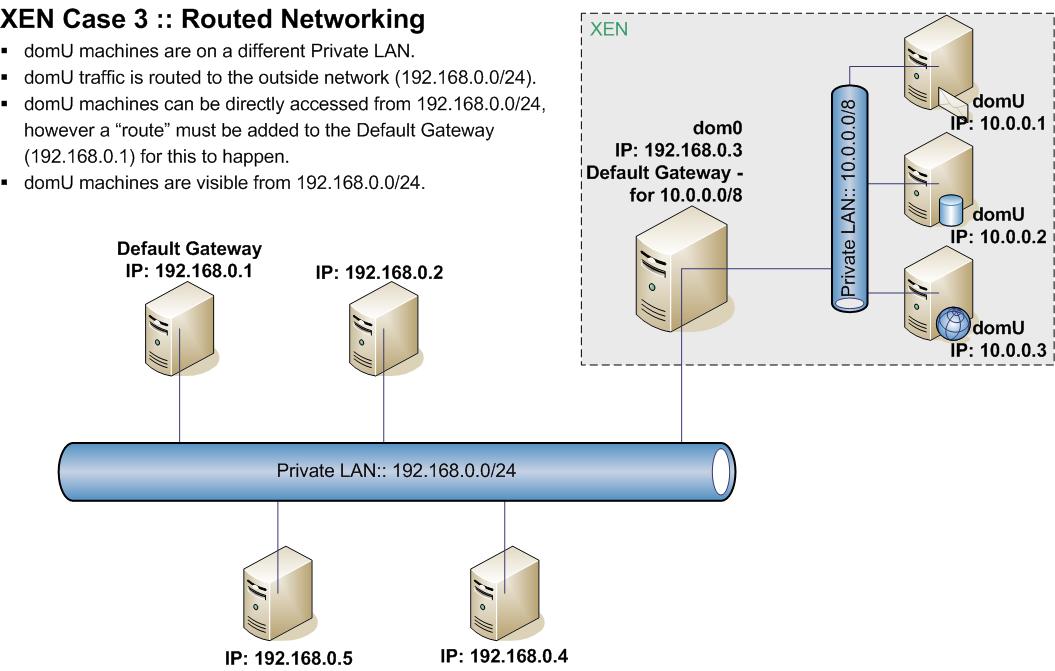
This xen config is more manual. Xen does very little for free using this config. Forwarding rules must be put in manually. This setup however allows for the greatest flexibility when it comes to routing and setting up a private network.
Network Diagram
http://wiki.kartbuilding.net/images/Xen_Networks3.jpg
To explain the above diagram a bit more: *domU machines are on a different Private LAN. *domU traffic is routed to the outside network (192.168.0.0/24). *domU machines can be directly accessed from 192.168.0.0/24. A “route” must be added to the Default Gateway (192.168.0.1) for this to happen. *domU machines are visible from 192.168.0.0/24. The only difference between this setup and the previous NAT Networking, is the fact that the domU machines are exposed on the external network. When a VM (10.0.0.1) ssh's to an external machine (192.168.0.5), its original IP is seen.
Xen Setup and Config for Two-way Routed Network
Only the essential pieces of networking configs are shown below.
:1. Configure xend-config.sxp vi /etc/xen/xend-config.sxp (network-script network-route) #(network-script network-bridge) #(network-script network-nat)
(vif-script vif-route) #(vif-script vif-bridge) #(vif-script vif-nat)
:2. Configure vm01.cfg (vm config file) vi /etc/xen/auto/vm01.cfg vif = 'ip=10.0.0.1' #thats all that is required for the networking part.
:3. Configure dom0 for Forwarding echo 1 > /proc/sys/net/ipv4/conf/all/proxy_arp iptables -t nat -A POSTROUTING -s 10.0.0.0 -j MASQUERADE
:4. Configure /etc/network/interfaces on the VM itself mount /srv/xen/vm01-disk.img /mnt vi /mnt/etc/network/interfaces auto eth0 iface eth0 inet static address 10.0.0.1 gateway 10.0.0.254 netmask 255.255.255.0
xm create /etc/xen/vm01.cfg xm console vm01
:5. Configure the Default Gateway 192.168.0.1 to see 10.0.0.0 In order to allow machines on the 192.168.0.0/24 IP range to see 10.0.0.0/8, we need to add a “route”. This is added into the Default Gateway of the external network (192.168.0.1) so that when any machine queries a 10.0.0.0/8 address, their default gateway is checked for an entry. 192.168.0.1:~# route add -net 10.0.0.0 netmask 255.255.255.0 gw 192.168.0.3 route
#to delete this route: route del -net 172.16.0.0 netmask 255.255.255.0 gw 193.1.99.76
Done. So all VMs (10.0.0.0/24) will be able to fully access each other. They will be able access the external network (192.168.0.0/24) via dom0. All traffic will be FORWARDED out via dom0. Any connections from 10.0.0.0/8 onto 192.168.0.0/24 will appear from the real IP address.
Note: Step 5 is critical. Without this last step, connections can not be made back to where they came from.
Troubleshooting Steps for Two-way Routed Network
On dom0, do a ifconfig and look for something similar to: dom0:~# ifconfig eth0 Link encap:Ethernet HWaddr 00:50:8B:DC:F7:2B
        inet addr:192.168.0.3  Bcast:192.168.0.3  Mask:255.255.255.0
        inet6 addr: fe80::250:8bff:fedc:f72b/64 Scope:Link
        UP BROADCAST RUNNING MULTICAST  MTU:1500  Metric:1
        RX packets:1105 errors:0 dropped:0 overruns:0 frame:0
        TX packets:723 errors:0 dropped:0 overruns:0 carrier:0
        collisions:0 txqueuelen:1000
        RX bytes:105354 (102.8 KiB)  TX bytes:99490 (97.1 KiB)
lo Link encap:Local Loopback
        inet addr:127.0.0.1  Mask:255.0.0.0
        inet6 addr: ::1/128 Scope:Host
        UP LOOPBACK RUNNING  MTU:16436  Metric:1
        RX packets:8 errors:0 dropped:0 overruns:0 frame:0
        TX packets:8 errors:0 dropped:0 overruns:0 carrier:0
        collisions:0 txqueuelen:0
        RX bytes:560 (560.0 b)  TX bytes:560 (560.0 b)
vif1.0 Link encap:Ethernet HWaddr FE:FF:FF:FF:FF:FF
        inet addr:192.168.0.3  Bcast:192.168.0.3  Mask:255.255.255.255
        inet6 addr: fe80::fcff:ffff:feff:ffff/64 Scope:Link
        UP BROADCAST RUNNING MULTICAST  MTU:1500  Metric:1
        RX packets:194 errors:0 dropped:0 overruns:0 frame:0
        TX packets:153 errors:0 dropped:0 overruns:0 carrier:0
        collisions:0 txqueuelen:0
        RX bytes:13094 (12.7 KiB)  TX bytes:25365 (24.7 KiB)
On dom0, do a route and compare it to: dom0:~# route Kernel IP routing table Destination Gateway Genmask Flags Metric Ref Use Iface 10.0.0.1 * 255.255.255.255 UH 0 0 0 vif1.0 192.168.0.0 * 255.255.255.0 U 0 0 0 eth0 default 192.168.0.1 0.0.0.0 UG 0 0 0 eth0
On dom0, do a iptables -L and compare it to: dom0:~# iptables -L Chain INPUT (policy ACCEPT) target prot opt source destination
Chain FORWARD (policy ACCEPT) target prot opt source destination ACCEPT 0 – 10.0.0.1 anywhere PHYSDEV match –physdev-in vif1.0 ACCEPT udp – anywhere anywhere PHYSDEV match –physdev-in vif1.0 udp spt:bootpc dpt:bootps
Chain OUTPUT (policy ACCEPT) target prot opt source destination
On dom0, do a iptables -t nat -L and compare it to: dom0:~# iptables -t nat -L Chain PREROUTING (policy ACCEPT) target prot opt source destination
Chain POSTROUTING (policy ACCEPT) target prot opt source destination MASQUERADE 0 – 10.0.0.0 anywhere
Chain OUTPUT (policy ACCEPT) target prot opt source destination
On domU, do a ifconfig and compare it to: vm01:~# ifconfig eth0 Link encap:Ethernet HWaddr 00:16:3E:35:B8:A1
        inet addr:10.0.0.1  Bcast:10.0.0.255  Mask:255.255.255.0
        inet6 addr: fe80::216:3eff:fe35:b8a1/64 Scope:Link
        UP BROADCAST RUNNING MULTICAST  MTU:1500  Metric:1
        RX packets:153 errors:0 dropped:0 overruns:0 frame:0
        TX packets:194 errors:0 dropped:0 overruns:0 carrier:0
        collisions:0 txqueuelen:1000
        RX bytes:25365 (24.7 KiB)  TX bytes:15810 (15.4 KiB)
Debugging and Helpful Tips
tcpdump
tcpdump is a very useful tool to see which connections are coming from an ip, and whether they are going unacknowledged or not!
192.168.0.1:~# tcpdump | grep 10.0.0.1
References
Excellent reference on proper IP referencing, including the CIDR notation: <br> http://en.wikipedia.org/wiki/IPv4_subnetting_reference
http://lists.xensource.com/archives/html/xen-users/2006-03/msg00949.html